Sunday, March 23, 2025

How to Hard Reset Your Stylo Inkosi Pro Smartphone – Easy Step-by-Step Guide

How to Hard Reset Your Stylo Inkosi Pro Smartphone – Easy Step-by-Step Guide

If your Stylo Inkosi Pro giving you issues like lagging, or being locked out? Performing the hard reset can help you restore your phone to its factory settings. This instructions will guide you exactly how to do it in a simple and easy way.


What is a Hard Reset, You Ask Yourself?

A hard reset wipes your phone completely and restores it to factory settings. This means:

✅ It removes all personal data (photos, videos, contacts, messages, apps, and saved accounts).
✅ It fixes software problems like lagging, crashing, or freezing.
✅ It removes forgotten passwords and screen locks (but not your Google account).

⚠️ Important: If possible, back up your important files before resetting, as everything on the phone will be deleted permanently.


Step-by-Step Guide to Hard Reset Your Stylo Inkosi Pro

Step 1: Switch Off Your Phone

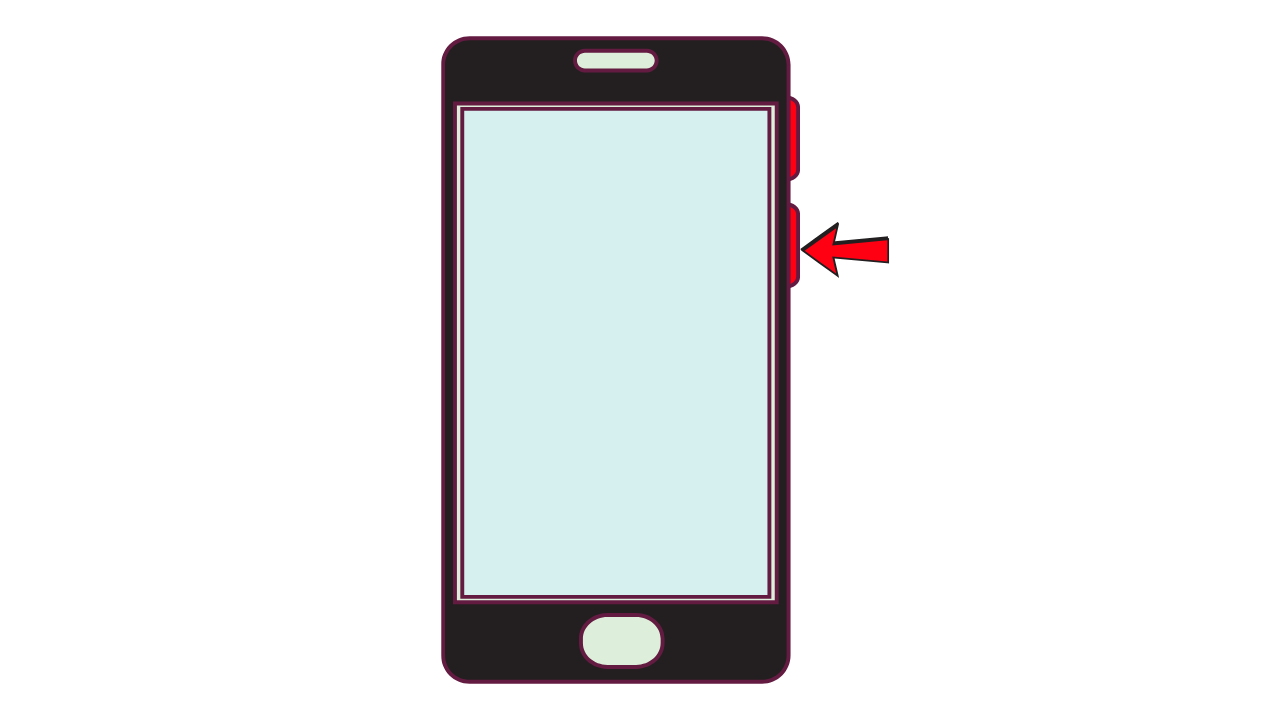
  1. Press and hold the Power button until the power menu appears.
  2. Tap Power Off and wait for the phone to switch off completely.

Step 2: Enter Recovery Mode

  1. Now Press and hold the Volume Down button and Power button button at the same time.
  2. When the Stylo start to boot , release the power buttons only.
  3. The Android Recovery Menu should appear. Then release the volume down button.

(If nothing happens, repeat the steps and try again.)


Step 3: Wipe Data & Factory Reset

  1. Use the Volume Down button to scroll to “Wipe data/factory reset.”
  2. Press the Power button to select it.

Step 4: Confirm the Reset

  1. On the next screen, use Volume Down to highlight “Yes” (or “Delete all user data”).
  2. Press the Power button to confirm.

(The phone will now erase everything and reset to factory settings.)


Step 5: Restart Your Phone

  1. Once the reset is done, the Recovery Menu will appear again.
  2. The option “Reboot system now” should be selected.
  3. Now Press the Power button to restart your Stylo Inoksi Pro.

What Is Going To Happen After the Reset?

  • Your phone will restart as if it’s brand new.
  • You will need to set it up from scratch, including Wi-Fi, Google account, and personal preferences.
  • If your phone was linked to a Google account, you will be asked to enter the same account after the reset (Factory Reset Protection - FRP).

FAQs & Troubleshooting

1. My phone is stuck on the logo after resetting. Now What should I do?

  • Press and holding the Power button for 10-15 seconds to force the phone to restart.
  • If the issue persists, repeat the hard reset process.

2. I forgot my Google account after resetting. How do I bypass FRP?

  • If FRP (Factory Reset Protection) is active, you must enter the previous Google account linked to the device.
  • If you don’t remember it, try recovering it via Google Account Recovery.

3. My phone doesn’t enter recovery mode. What can I do?

  • Make sure your phone is completely off before pressing the buttons.
  • Try holding the buttons for longer (at least 10 seconds).

Final Thoughts

A hard reset can fix software problems, remove forgotten passwords, and improve performance, but remember that it deletes everything on your phone. Always back up your data if possible.

๐Ÿ’ฌ Still need help? Drop your questions in the comments!

Mobicel MX3 Plus Review: Budget-Friendly or Budget-Frustrating?

๐Ÿ“ฑ Mobicel MX3 Plus Review: Budget-Friendly or Budget-Frustrating? 

If you’re looking for a super affordable smartphone in South Africa, you’ve probably come across the Mobicel MX3 Plus. But is it any good? Can it handle your daily WhatsApps, Facebook scrolling, and maybe the odd YouTube video? ๐Ÿค”

Let’s break it down in a way that actually matters!


๐ŸŽจ First Impressions: A Small but Colourful Device

Straight out of the box, the Mobicel MX3 Plus keeps things simple. It’s got a 5-inch TFT display—not the sharpest screen in the world, but hey, for texting, calls, and social media, it’ll do the job.

The big plus? The Green Colour. ๐Ÿ If you’re tired of old boring black usual phones, this one definitely stands out! It’s light in weight and very compact, making it easy to carry around.


⚡ Performance: Can It Keep Up?

With 2GB of RAM and 16GB of storage, you’re not getting a powerhouse here. But for basic tasks like:

✔️ WhatsApp
✔️ Facebook & Instagram
✔️ Light web browsing

…it should be okay. Just don’t expect to run heavy apps or games smoothly. ๐ŸŽฎ ❌

You can extend the storage up to 64GB with an external SD card, so at least you won’t run out of storage fast.


๐Ÿ“ธ Cameras:

Let’s be real—if you love taking photos, this isn’t the phone for you. The MX3 Plus has:

๐Ÿ”น A 5MP rear camera for quick snaps.
๐Ÿ”น A 0.3MP selfie camera (yes, 0.3MP, that’s not a typo). ๐Ÿ˜…

In good lighting, you can take decent pictures. But in low light? Let’s just say… don’t expect magic. ✨

If you mostly use your phone for video calls rather than serious photography, this camera setup should still be okay.


๐Ÿ”‹ Battery Life: Will It Last the Day?

With the 2200mAh battery, you’re looking at a full day of light use, calls, texts, and a bit of social media. But if you’re always on YouTube or WhatsApp, you’ll definitely need to charge before the end of the day. ๐Ÿ”Œ

๐Ÿ’ก Battery Tip: Don't forget to Turn on battery saver mode to extend your usage!


๐Ÿ“ก Connectivity & Extra Features

✔️ Dual SIM Support – Use two numbers at once.
✔️ 4G LTE  Fast Connectivity – You get Faster browsing & streaming.
✔️ Extendable Storage – MicroSD supported, up to 64GB.
✔️ Headphone Jack – Yes, it does take the wired headphone jacks ! ๐ŸŽง


๐Ÿ‘€ What Are People Saying?

And Now, here’s where the things get interesting. Some the South Africans have had mixed experiences with the Mobicel smartphones. While some appreciate the affordability, others report problems like:

Slow performance
Battery draining fast
Screen responsiveness issues

One user on HelloPeter even said:
"Worst phone ever. More doesn’t work on it than works." ๐Ÿ˜ฌ

Ouch! But hey, every budget phone has trade-offs, so it depends on your expectations.


๐Ÿค” Final Verdict: Should You Buy It?

Buy it if:
✔️ You need a super affordable phone.
✔️ You want dual SIM functionality.
✔️ You just need a basic device for calls, texts & social media.

Skip it if:
✖️ You need fast performance.
✖️ You want a good camera.
✖️ You hate dealing with lag.

But At the end of the day, the Mobicel MX3 Plus smartphone is a budget-friendly option for those people who just need a simple smartphone. If you expect speed, best cameras, or smoother performance, you might need to look at other options.

Would you buy the Mobicel MX3 Plus? Drop a comment below! ๐Ÿ‘‡


๐Ÿ”ด Want to see it in action? Watch this Review video here:

Saturday, March 22, 2025

Stylo Quantum Review – Lekker Budget Phone for just R1999

Stylo Quantum Review – Lekker Budget Phone for just R1999

Hey, youngster, if you're looking for a good phone that won’t empty your pockets, the Stylo Quantum is worth checking out. For just R1999, you’re getting a big battery, decent cameras, and enough RAM to keep things running smooth. Let us break it down and see.


๐Ÿ”‹ Battery – 5000mAh, Goes All Day

This Stylo Quantum got a 5000mAh battery, which means you can go all day long without stressing about charging. Whether you are on TikTok, WhatsApp, or just playing heavy games, it won’t die on you too quickly. It Just does not support super-fast charging—at this price, you get what you pay for.


๐Ÿ“ธ Cameras – 50MP Triple Rear + 16MP Selfie

For a budget phone, the 50MP triple camera is actually quite decent. In daylight, your photos will be sharp and clear. At night? Eish, not so great, but still usable. The 16MP front camera is nice for selfies and video calls—you’ll look good, just make sure you’ve got proper lighting.


Performance – 12GB RAM (6+6GB Virtual) Keeps Things Smooth

Now, this is where the Stylo Quantum surprises. It’s got 6GB RAM, plus another 6GB virtual RAM, making it 12GB in total. That’s a lot for a phone this cheap! Apps open very fast, switching between them is very smooth, and even heavy gaming works fine. Plus, with about 128GB storage, you can store all your pics, videos, and music without any problem.


๐Ÿ“ฑ Screen – Big 6.82-Inch Display

The screen is huge6.82 inches—which is lekker for watching YouTube or scrolling through social media. It’s not the sharpest display out there, but for the price, it does the job.


⚖️ Final Verdict – Is It Worth It?

For R1999, this phone is actually a bargain. The battery lasts, the cameras are decent, and the RAM is more than enough for daily use. If you need a reliable phone for social media, chatting, and everyday stuff, this one will work just fine.

Pros:
✔️ Massive 5000mAh battery – lasts all day
✔️ 50MP triple camera – nice pics in good light
✔️ 12GB RAM (6+6GB virtual) – smooth performance
✔️ 128GB storage – plenty of space
✔️ **Big 6.82-inch screen

Friday, March 21, 2025

How to Hard Reset Your Stylo Quantum (Fix Stuck on Logo, Bypass Lock Screen & More!)

How to Hard Reset Your Stylo Quantum (Fix Stuck on Logo, Bypass Lock Screen & More!)


Incase you're locked out of your Stylo Quantum smartphone because  you have forgotten your password, pin or pattern, or your phone is stuck on the Stylo screen, don't stress—we’ve got you covered! By hard resetting (factory reset) your Stylo phone can help fix software problems, bypass the lock screen, and get your phone running like new again.

⚠️ Important: A hard reset delete all data on your Stylo Quantum! If you need to recover data after a reset, check the “Data Recovery” section below.


๐Ÿ”ง How to Hard Reset Your Stylo Quantum (Factory Reset)

1️⃣ Turn off your phone – If it’s frozen or unresponsive, hold the Power button until it shuts down.

2️⃣ Enter Recovery Mode:

  • Press and hold the Volume Up + Power button at the same time.
  • When the Stylo Quantum logo appears, release the Power button but keep holding Volume Up until you see the Android Recovery Menu.

3️⃣ Navigate to Factory Reset:

  • Use the Volume buttons to scroll and highlight "Wipe data/factory reset."
  • Press the Power button to select it.

4️⃣ Confirm the Reset:

  • Select "Yes – delete all user data."
  • Wait for the process to complete.

5️⃣ Reboot Your Phone:

  • Select "Reboot system now."
  • Your Stylo Quantum will restart, and you’ll need to set it up again like a new phone.

๐Ÿ”‘ How to Bypass Stylo Quantum Lock Screen

If you have forgotten your password, PIN or pattern, a hard reset is the only way to unlock the lock screen๐Ÿคž. However, if your Google account is linked, you may be asked to enter your Google login details (FRP lock) after resetting your Stylo Quantum.

  • If you don’t remember your Google account details, you might need a Google FRP bypass Instructions : Click here.

๐Ÿ’พ Data Recovery After Reset (Can You Get Your Files Back?)

A factory reset deletes everything, but here are a few ways to try and recover lost data:

Google Backup: If you had backups enabled, sign in with your Google account during setup and restore from Google Drive.
SD Card: If your files were on an SD card, they won’t be erased by the reset.
Data Recovery Software: Some PC programs claim to recover lost files from formatted devices, but success isn’t guaranteed.


Still Stuck? Need More Help?

If your Stylo Quantum is stuck on the logo after the reset or keeps boot looping, try these extra steps:
๐Ÿ”น Remove and reinsert the battery (if removable).
๐Ÿ”น Boot into Safe Mode (Press & hold Volume Down during startup).
๐Ÿ”น Flash a fresh firmware using Odin or SP Flash Tool (for advanced users).

I hope this helps! Let us know in the comments below if you have any questions or if this helped you.

How to Bypass Google FRP on Mobicel MX2 Plus (step by step instructions )

๐Ÿ”“ How to Bypass Google FRP on Mobicel MX2 Plus (step by step instructions ) ๐Ÿ”“

After hard reset, If your Mobicel MX2 Plus is stuck on the Google Account Verification (FRP lock) screen, and you can't remember the previous Google account login details, follow these steps to bypass FRP instructions and regain access to your Mobicel Mx2 plus.


⚠️ Important Notes Before You Begin

FRP (Factory Reset Protection) is a security feature to prevent unauthorized access after a reset.
✅ This guide is for legal purposes only – you must be the rightful owner of the device.
✅ A Wi-Fi connection ๐Ÿ“ถ is required for this process.


๐Ÿ›  Method 1: Bypass FRP Using Emergency Call Trick

Step 1: Connect to Wi-Fi ๐Ÿ“ถ

1️⃣ Turn on your Mobicel MX2 Plus and connect to a Wi-Fi network.
2️⃣ Continue setup until you reach the Google Account Verification screen.

Step 2: Open Emergency Call & Use Code

1️⃣ Tap "Emergency Call" on the setup screen.
2️⃣ Dial *#813# and press the call button ๐Ÿ“ž.
3️⃣ If this method works, your phone will automatically bypass FRP and take you to the home screen! ๐ŸŽ‰

⚠️ If this code doesn’t work, proceed to Method 2.


๐ŸŒ Method 2: Bypass FRP Using YouTube & Chrome

Step 1: Get to Google Chrome via YouTube

1️⃣ On the Google Account Verification screen, tap the keyboard icon when the email field appears.
2️⃣ Tap "Settings" ⚙️ from the keyboard menu.
3️⃣ Scroll down and select "Help & Feedback" ❔.
4️⃣ In the search bar, type "Delete or disable apps on Android" and select it from the results.
5️⃣ Tap "Tap to go to application settings."

Step 2: Access Google Chrome

1️⃣ In App Settings, find and open YouTube ๐Ÿ“บ.
2️⃣ Tap "App Info" > "Advanced Settings" > "Open YouTube".
3️⃣ Tap the three dots (top-right corner) > Terms & Privacy Policy – this will open Google Chrome ๐ŸŒ.
4️⃣ In Chrome, search for “FRP Bypass APK download” (use a trusted site).
5️⃣ Download and install "FRP Bypass APK" ๐Ÿ“ฅ.


Step 3: Install & Remove Google Account

1️⃣ Open the FRP Bypass app after installation.
2️⃣ Tap "Google Account Manager" > "Bypass FRP".
3️⃣ Tap "Sign in with a new account" and enter a new Google account.
4️⃣ Restart your phone ๐Ÿ”„ and complete the setup – FRP should now be removed! ๐ŸŽ‰


๐Ÿ“ข Method 3: FRP Bypass Using TalkBack (Alternative Method)

If the previous methods don’t work, try this:

Step 1: Enable TalkBack ๐Ÿ—ฃ

1️⃣ On the Google Account Verification screen, press & hold both Volume Up + Volume Down to enable TalkBack.
2️⃣ Draw an L shape on the screen (gesture control).
3️⃣ Tap "TalkBack Settings", then disable TalkBack by holding Volume Up + Down again.

Step 2: Open Chrome & Download FRP Bypass APK

1️⃣ In TalkBack Settings, go to Help & Feedback.
2️⃣ Follow the YouTube/Chrome method (Step 2 from Method 2 above).
3️⃣ Download & install FRP Bypass APK, sign in with a new Google account, and restart.


๐Ÿ›  Alternative Solutions If Bypass Fails

Use FRP Removal Software on a PC – Programs like Tenorshare 4uKey, FRP Hijacker, or UnlockGo can remove FRP.
Flash the Stock Firmware – If nothing works, you may need to reinstall the official Mobicel MX2 Plus software using SP Flash Tool or similar tools.


That’s it! ๐ŸŽ‰ Your Mobicel MX2 Plus should now be FRP-free and ready to use. Let me know if you need more help! ๐Ÿš€๐Ÿ’™

How to Hard Reset Mobicel MX2 Plus (Factory Reset Guide)

๐Ÿ”„ How to Hard Reset Mobicel MX2 Plus (Factory Reset Guide) ๐Ÿ”„

Incase Mobicel MX2 Plus is stuck, not responding, or you forgot your password, pattern and pin, performing a hard reset (also called a factory reset) can reset it to its factory state. Follow these steps carefully! ✅


---

⚠️ Before You Begin

You have to Backup your data ๐Ÿ“ – A hard reset will wipe everything, so you must save your contacts, photos, and important files.
Charge your phone ๐Ÿ”‹ – Make sure the Mobicel device is charged to 50% battery to avoid shutdowns during the hard reset.
Remove your SD card ๐Ÿ’พ – To avoid accidental data loss. Remove your SD card from them Mobicel Mx2 plus


---

๐Ÿ“ฑ Method 1: Hard Reset via Settings (If Phone is Responsive)

If your Mobicel MX2 Plus is still working and you just want to reset it:

1️⃣ Go to ⚙ Settings on your Mobicel MX2 Plus.
2️⃣ Scroll down and tap System > Reset options.
3️⃣ Select Factory Data Reset ๐Ÿ—‘ (or Erase all data).
4️⃣ Tap Reset Phone and confirm when prompted.
5️⃣ Your phone will restart and erase everything, restoring it to factory settings! ๐ŸŽ‰


---

๐Ÿš€ Method 2: Hard Reset Using Buttons (For Frozen or Locked Phones)

If your phone is not responding or you forgot your password, pattern or pin, use this method:

Step 1: Switch Off the Mobicel Mx2 plus ๐Ÿ“ด

๐Ÿ”น Just Press and hold the Power button until the until the Mobicel Mx2 plus completely shutdown .
๐Ÿ”น Incase the Mobicel Mx2 plus is stuck, press and hold the Power button to force shutdown.


Step 2: Enter Recovery Mode ๐Ÿ”„

๐Ÿ”น Press and hold Volume Up + Power buttons together.
๐Ÿ”น When the Mobicel logo appears, release only the Power button, but keep holding Volume Up.
๐Ÿ”น If you see a “No Command” screen ๐Ÿ˜ฑ, don’t panic! Press and hold Power, then tap Volume Up once to enter Recovery Mode.


Step 3: Wipe Data/Factory Reset ๐Ÿ—‘

๐Ÿ”น Use the Volume Down button to scroll to “Wipe data/factory reset.”
๐Ÿ”น Press the Power button to select it.
๐Ÿ”น Select “Yes – delete all user data” using Volume Down, then press Power to confirm.


Step 4: Reboot the System ๐Ÿ”„

๐Ÿ”น Once the reset is complete, highlight “Reboot system now” and press Power to restart the phone.
๐Ÿ”น Your Mobicel MX2 Plus will restart like a brand-new device! ๐ŸŽ‰


๐Ÿ’ก Common Issues & Fixes

Phone stuck on the Mobicel logo after resetting? ๐Ÿ›‘

Wait at least 10–15 minutes ⏳; the first boot takes longer.

If it’s still stuck, repeat the hard reset.


Buttons not working to enter Recovery Mode? ๐Ÿ”˜

Try using Power + Volume Down instead of Power + Volume Up.


Forgot Google account after reset (FRP lock)? ๐Ÿ”

After resetting, the phone may ask for the previous Google account.

If you don’t remember it, click here for Google frp bypass instructions.


How to Bypass Google FRP on Stylo Universe (Google Account Verification Bypass) step by step instructions

How to Bypass Google FRP on Stylo Universe (Google Account Verification Bypass) step by step instructions 

If your Stylo Universe is stuck on the Google Account Verification (FRP lock) screen after a factory reset and you don’t remember the previous Google account, follow these steps to bypass FRP and regain access to your phone.


⚠️ Important Notes Before You Start

FRP (Factory Reset Protection) is a security feature that prevents unauthorized access after a factory reset.
✅ This method is for legal purposes only—you must be the rightful owner of the device.
✅ A Wi-Fi connection is required for this process.


Method 1: Bypass FRP Using Emergency Call Trick

Step 1: Connect to Wi-Fi

  1. Turn on your Stylo Universe and connect to a Wi-Fi network.
  2. Continue setup until you reach the Google Account Verification screen.

Step 2: Open Emergency Call & Use Code

  1. Tap "Emergency Call" on the setup screen.
  2. Dial *#813# and press the call button.
  3. If this method works, your phone will automatically bypass FRP and take you to the home screen.

⚠️ If this code doesn’t work, proceed to Method 2.


Method 2: Bypass FRP Using YouTube & Chrome

Step 1: Get to Google Chrome via YouTube

  1. On the Google Account Verification screen, tap the keyboard icon when the email field appears.
  2. Tap "Settings" from the keyboard menu.
  3. Scroll down and select "Help & Feedback".
  4. In the search bar, type "Delete or disable apps on Android" and select the option from the results.
  5. Tap "Tap to go to application settings."

Step 2: Access Google Chrome

  1. In App Settings, find and open YouTube.
  2. Tap "App Info" > "Advanced Settings" > "Open YouTube".
  3. Tap the three dots (top-right corner) > Terms & Privacy Policy—this will open Google Chrome.
  4. In Chrome, search for “FRP Bypass APK download” (use a trusted site).
  5. Download and install "FRP Bypass APK".

Step 3: Install & Remove Google Account

  1. Open the FRP Bypass app after installation.
  2. Tap "Google Account Manager" > "Bypass FRP".
  3. Tap "Sign in with a new account" and enter a new Google account.
  4. Restart your phone and complete the setup—FRP should now be removed! ๐ŸŽ‰

Method 3: FRP Bypass Using TalkBack (Alternative Method)

If the previous methods don’t work, try this:

Step 1: Enable TalkBack

  1. On the Google Account Verification screen, press & hold both Volume Up + Volume Down to enable TalkBack.
  2. Draw an L shape on the screen (gesture control).
  3. Tap "TalkBack Settings", then disable TalkBack by holding Volume Up + Down again.

Step 2: Open Chrome & Download FRP Bypass APK

  1. In TalkBack Settings, go to Help & Feedback.
  2. Follow the YouTube/Chrome method (Step 2 from Method 2 above).
  3. Download & install FRP Bypass APK, sign in with a new Google account, and restart.


Let me know on the comments below if you need further help! ๐Ÿš€

How to Bypass FRP on Itel V53 (Google Account Verification Bypass)

How to Bypass FRP on Itel V53 (Google Account Verification Bypass)

If your Itel V53 is stuck on the Google Account Verification (FRP lock) after a factory reset and you can’t remember the previous account, follow these steps to bypass FRP and regain access to your phone.


⚠️ Important Notes Before You Start

FRP (Factory Reset Protection) is a security feature that prevents unauthorized access after a factory reset.
✅ This method is for legal purposes only—you must be the rightful owner of the device.
✅ A Wi-Fi connection is required for this process.


Method 1: Bypass FRP Using Emergency Call & Settings Trick

Step 1: Connect to Wi-Fi

  1. Turn on your Itel V53 and connect to a Wi-Fi network.
  2. Continue until you reach the Google Account Verification screen.

Step 2: Open Emergency Call

  1. Tap Emergency Call on the setup screen.
  2. Dial *#813# and press the call button.
  3. If this works, the phone will automatically bypass FRP and take you to the home screen.

⚠️ If this code doesn’t work, proceed to Method 2.


Method 2: FRP Bypass Using YouTube & Settings (For Newer Android Versions)

Step 1: Get to the YouTube App

  1. On the Google Account Verification screen, tap the keyboard icon when the email field appears.
  2. Tap "Settings" from the keyboard menu.
  3. Scroll down and select "Help & Feedback".
  4. In the search bar, type "Delete or disable apps on Android" and select the option from the results.
  5. Tap "Tap to go to application settings."

Step 2: Access Chrome & Download FRP Bypass App

  1. In App Settings, find YouTube and open it.
  2. Tap "App Info" > "Advanced Settings" > "Open YouTube".
  3. Tap the three dots (top-right corner) > Terms & Privacy Policy—this will open Google Chrome.
  4. In Chrome, search for “FRP Bypass APK download” (use a trusted site).
  5. Download and install "FRP Bypass APK".

Step 3: Install & Remove Google Account

  1. Once installed, open the FRP Bypass app.
  2. Tap "Google Account Manager" > "Bypass FRP".
  3. Tap "Sign in with a new account" and enter a new Google account.
  4. Restart your phone and set it up normally—FRP should now be removed! ๐ŸŽ‰

Method 3: FRP Bypass Using TalkBack (Alternative Method)

⚠️ This method works on some Itel models but may not work on the V53. Try if other methods fail.

  1. On the Google Account Verification screen, press & hold both Volume Up + Volume Down to enable TalkBack.
  2. Draw an L shape on the screen (gesture control).
  3. Tap **"TalkBack Settings

How to Hard Reset Stylo Swift 4g: Full step by step instructions

How to Hard Reset Stylo Swift 4g: Full step by step instructions 


Before You Begin:


Backup your data! A hard reset erases everything, so save important stuff like photos, contacts, and messages.


Charge your phone. Make sure it’s at least 50% so it doesn’t die during the reset.


Remove your SD card (if you have one) to avoid losing any extra data.


Method 1: Hard Reset via Settings (If Your Phone is Responsive)


If your phone is still working but you just want to factory reset it:


1. Go to Settings on your Stylo Swift 4G.


2. Scroll down and tap System or Backup & Reset (depends on your software).


3. Select Factory Data Reset or Erase all data.


4. Tap Reset Phone and confirm when prompted.


5. Your phone will restart and wipe everything. Once done, it’ll boot up like a brand-new device!


Method 2: Hard Reset Using Buttons (For Frozen or Locked Phones)


If your phone is completely unresponsive or you forgot your password, use this method:


1. Turn off the Stylo Swift 4g. (If it’s stuck, press and hold the power button for about 10 seconds until it shuts down.)


2. Press and hold the Power button + Volume Up buttons at the same time to boot the Stylo to recovery mode.


3. When the Stylo Swift logo appears, release the buttons.


4. Use the Volume buttons to navigate and highlight Wipe data/factory reset.


5. Press the Power button to select it.


6. Select Yes – delete all user data and confirm with the Power button.


7. Once the reset is complete, select Reboot system now.


Your phone will restart and take a few minutes to load. After that, it’s as fresh as new!


Common Problems & Fixes


Phone stuck on the logo after resetting?


Wait a few minutes—it can take longer the first time.

If it’s stuck for more than 20 minutes, repeat the hard reset.


Buttons not working for the reset?


Try Power + Volume Down instead of Power + Volume Up.


Forgot Google account after reset?


If your phone asks for an old Google account after resetting, that’s Factory Reset Protection (FRP). You’ll need to log in with the same Google account that was on the phone before the reset. If you forgot it, you might need extra steps to bypass it.


That’s it! Your Stylo Swift 4G should be good as new. Let me know if you need more help!


Thursday, March 20, 2025

How to Hard Reset the Hisense T1 Pro: A Simple step by step Guide for Beginners

 How to Hard Reset the Hisense T1 Pro: A Simple step by step Guide for Beginners


Why Hard Reset Your Hisense T1 Pro?

  • The phone is running very slow.

  • Apps keep crashing.

  • You forgot your password or pattern lock.

  • The phone is stuck on the logo screen.

  • You want to erase everything before selling or giving it away.

Before You Reset: Important Steps

A hard reset will delete everything on your phone, so be sure to:

  • Back up your important files to Google Drive, an SD card, or a computer.

  • Remove your Google account (if possible) to prevent FRP (Factory Reset Protection) issues.

  • Charge your battery to at least 50% to avoid shutdown during the reset process.

How to Hard Reset Your Hisense T1 Pro

Follow these steps carefully:

Method 1: Reset from Settings (If Phone is Working)

  1. Open Settings on your phone.

  2. Scroll down and select System.

  3. Tap Reset Options.

  4. Choose Erase all data (Factory reset).

  5. Confirm and wait for the process to complete.

Method 2: Reset Using Buttons (If Phone is Locked or Frozen)

  1. Turn off your Hisense T1 Pro.


  2. Now Press and hold the Power button and Volume Up buttons at the same time, Release the power button when the phone start to boot

  3. Release the buttons when you see the Android Recovery Menu.

  4. Use the Volume buttons to navigate to Wipe data/factory reset.

  5. Press the Power button to select it.


  6. Choose Yes – Delete all user data using the Volume buttons, then press the Power button to confirm.

  7. Once the reset is complete, select Reboot system now.

Your phone will restart, and it will be like a brand-new device.

After the Reset: Setting Up Your Hisense T1 Pro

Once your phone turns on:

  • Select your language and follow the setup instructions.

  • Connect to Wi-Fi and sign in to your Google account.

  • Restore your data from the backup (if you made one).

  • Reinstall your favorite apps from the Google Play Store.

Final Thoughts

A hard reset can fix many software problems, but use it as a last resort. Always back up your data before resetting. If your Hisense T1 Pro still has issues after a reset, it might need professional repair.

Did this guide help you? Let us know in the comments!


hard Reset Itel V53 step by step guide

Hard Reset Itel V53: Step-by-Step Guide


If your Itel V53 is Stuck on the logo or you forgot your password pin or pattern, performing a hard reset (also known as a factory reset) can help. Follow this step-by-step instructions to reset your Itel V53 and get it working again like new.


Step 1: Turn Off Your Itel V53


Hold the Power button and turn it off. Simple!


Step 2: Enter Recovery Mode ๐Ÿ”„


1. Press and hold both the Volume Up and Power buttons together.


2. Keep holding until you see the Itel logo, then release the buttons.


3. If you see "No Command", don’t panic!


Press and hold Power, then tap Volume Up once to enter Recovery Mode.


Step 3: Choose "Wipe Data" (Erase Everything) ๐Ÿ—‘


1. Use the Volume Down button to scroll down to "Wipe data/factory reset."


2. Press the Power button to select it.


Step 4: Confirm the Reset ✅


1. The screen will ask, “Are you sure?”


2. Use Volume Down to highlight "Yes", then press Power to confirm.


3. The phone will begin the reset process.


Step 5: Restart and Set It Up Again ๐Ÿš€


1. Once the reset is complete, choose "Reboot system now."


2. Press Power to restart the phone.


3. After rebooting, you’ll need to set it up again:


Select your language


Connect to Wi-Fi


Sign in to your Google account (if needed)

And boom! ๐ŸŽ‰ Your Itel V53 is back in action, fresh like it just came out of the box!

If you need instructions on how to bypass Google frp on your Itel V53 click here


Let me know if you run into any issues!